Q: I pay all the utilities for residents in my community. What is the best and most economical way to save on the utility costs?
A: Blown-in attic insulation is the best bang for the buck when it comes to cutting down on heating and cooling. It is very quick, easy and economical. Blown-in insulation is easy enough for a DIY, yet cheap enough to have a professional do the work. We also recommend replacing all of the incandescent lightbulbs with LEDs. This is as easy as unscrewing one energy-
hogging bulb and replacing it with an ultra-efficient one. The LED bulbs offer far more light at a fraction of the cost. If you replace all interior and exterior lights, you should see a substantial reduction in your utility bill. LED bulbs and light fixtures have a very long service life and will save money in the long run. You should check with your city or utility supplier—they often have low-cost energy saving programs or rebates.
Q: I understand why it is bad to put banana peels, celery and potato skins down the garbage disposal because they are fibrous or prone to compression. But why are coffee grounds also bad put in the disposal if they are small enough to pass right through?
A: We find most people put too much in the disposal and don’t use enough water. What happens with the coffee grounds, especially with back-to-back drains, is that they tend to pile up in the pipe as it goes through the wall. Over time, it will pack the pipe completely. The garbage disposal does not have trouble with the grounds themselves, it is what happens after they leave the disposer. Again, if the coffee grounds are fed slowly into the disposal with plenty of water running, the grounds will disperse and not compact in the drain line. However, it is best not to dump them in the sink in the first place.
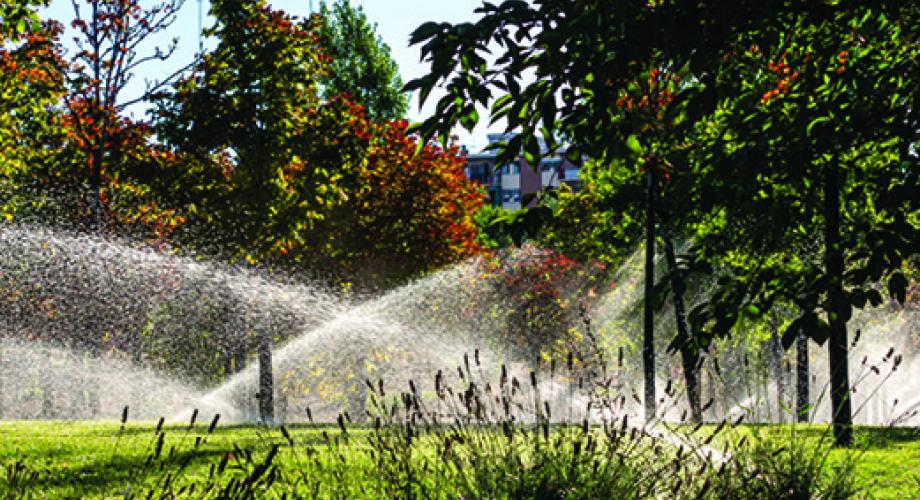
Q: I am planning to install a new sprinkler system in the lawn area of the property. How do I estimate the number of heads and how far apart do they need to be?
A: First, get an accurate measurement of the area where you want to install the sprinkler system. Transfer the measurements to graph paper and decide on a scale, such as one square of the graph paper equals one foot or, if you have a large area, one square equals five or 10 feet. Draw the dimensions of the area you are planning to irrigate.
Next, decide what type of sprinkler head you will be using such as impact sprinkler (Rainbird type), brass heads or pop up, or rotary heads. The manufacturer will list the water spray radius. Multiply by two to calculate the diameter the head will cover but knowing the radius should be enough for this purpose. The spray coverage should overlap each head between 80% and 100%. This means that if the sprinkler head has a spray radius of 10 feet, each sprinkler head should be spaced 10 feet apart. This is called head-to-head spacing.
If you deviate more than 80%, you may get dry spots at the times when you need water the most, such as during summer heat and windy conditions. Stated simply: Sprinkler A should wet Sprinkler B, and so on. On the graph paper, grid the circles so they intersect and touch each sprinkler head. Don’t forget, the more sprinkler heads you have, the more you will need to pay attention to both gallons per minute (GPM) and water pressure supplying your sprinkler system. The sprinkler manufacturer should have a chart showing how many sprinkler heads can be controlled by one valve depending on the GPM
at a certain water pressure.
Further insight can be found at irrigationtutorials.com.
Q: My units all have dishwashers. I am starting to get complaints from the residents that the dishwashers do not clean the dishes as well as they did when new. What is the problem and what can I do about it?
A: A number of issues may cause this problem:
1. Check that the dishwasher’s filter or grates are not clogged. The filters are commonly found under the rotating spray arms at the bottom of the dishwasher. The filters normally snap in and out of place. Remove them gently and watch for broken glass.
2. Check the operation of the water inlet solenoid valve. It should open and close crisply.
3. Related to the inlet valve is the water level sensor. Its sensor looks like a small, upside-down cup or float, normally located at the front corner of the tub. Calcium buildup can sometimes cause the water level sensor float to malfunction, causing too little water to be allowed into the dishwasher. Cleaning the float area with vinegar should help.
4. Check the temperature of the water going into the dishwasher. The water should be at least 140 degrees.
5. Hard water is most likely the biggest hindrance to having clean- looking dishes. The dishes may actually be clean but look dingy or milky. Hard water will cause calcium and mineral deposits to adhere to all wet areas of the dishwasher and over time the dishes themselves. The rotating spray arms may fill with mineral buildup and clog. To remove the hard water deposits, run the dishwasher empty on its longest setting, usually the pots and pans setting. Add a few cups of vinegar to the water without soap or dishes. Run the dishwasher with clear water through a short cycle to flush the vinegar before using again.
6. Installation of a soft water system will greatly improve the performance of any dishwasher, as will using name brand dishwashing soap. Soft water will make a huge difference in calcium buildup in the dishwasher as well as the water heater.
Do you have DIY maintenance questions? Send them to
[email protected].