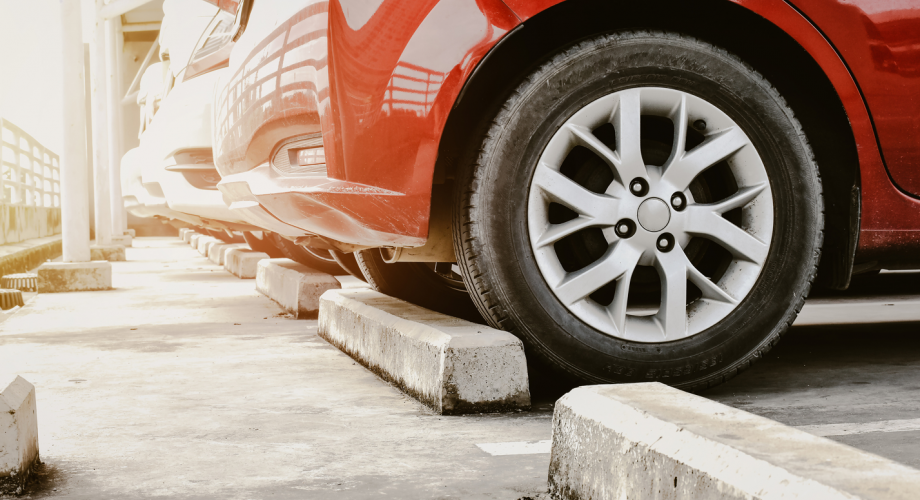
Q: I have a parking area at my building with concrete bumper stoppers. The problem is that they move when the cars touch them. How do I attach them to the parking lot?
A: It is quite easy if you have an asphalt parking lot. Most concrete bumper stoppers have two holes that go through from top to bottom. These holes are just the right size to fit a piece of half-inch rebar rod. You’ll need two 12-to-18-inch pieces of rebar for each stopper. Place the rebar through the holes in the stopper and then use a sledgehammer to pound the rebar into the asphalt.
If your parking area is concrete, use a hammer drill with a half-inch concrete bit to drill a hole in the concrete. Use your existing parking bumper as a guide. Either drill down through the holes in the bumper stop to the concrete below or use powdered chalk poured down through the bumper stop’s holes to mark the concrete. Drill all the way through the concrete until you hit dirt. Hammer your rebar into the bumper and concrete. If the fit is loose, pour some concrete into the parking lot holes and then insert the rods.
Q: A resident is complaining that their water heater is knocking and making rumbling noises. What is the problem and how do I fix it?
A: This is what we call a tell-tale sign of a looming issue. The tank could start to leak or burst if this issue is left unchecked. Sediment collects in the bottom of the tank and traps water under layers of minerals such as calcium and lime. When the burner heats the water, the trapped water boils and bubbles up causing the rumbling or knocking noise. The solution is to flush the water heater of any accumulated sediment. (It is assumed the tank in question is not a commercial unit with a clean out port.)
Flushing procedure:
- Turn off the gas or breaker to the heater.
- Turn off the water supply above the tank.
- Connect a hose to the drain valve at the bottom of the tank so the water can drain away from the heater. (Leave this valve closed for the moment.)
- Open a hot water valve such as a shower valve or kitchen faucet.
- Open the valve at the bottom of the tank to let the water drain through the hose. Caution: This water will be hot.
- Allow the tank to completely drain.
- Once the tank is empty, open and close the cold-water valve above the water heater. This will help flush any remaining sediment from the tank. Do this until the water runs clear out of the hose connected to the heater drain valve.
- Close the drain valve and disconnect the hose from the bottom of the tank.
- Open the cold-water valve above the water heater to fill the tank.
- When water starts coming out of the shower or kitchen valves, the tank is full. Turn off the shower and kitchen valves. Leave the cold-water valve above the water heater open.
- Re-light the gas burner pilot and turn on the burner or switch on the breaker for an electric heater.
This procedure should be part of your preventive maintenance routine and done once a year, every year. If done annually, this maintenance routine will significantly extend the life of your water heater.
Prepare Your Pre-Winter Check List Now
Bonus guidance: Although we are in mid-summer, winter is coming! Now is the time to review your pre-winter check list and do your preventive maintenance. Do you have a pre-winter check list? If not, here are a few tips to get started:
- Check the roof for damage. Check the flashing, roof transitions and fascia boards. Don’t forget to check downspouts and drain covers.
- Check all the windows and make sure they are well sealed. Clean out the weep holes in any aluminum window frames and caulking on wooden windows. This is a good time to put a drop of grease on the moving parts of the crank out windows. Check screens for holes and replace any missing screens.
- Ensure the proper operation of all smoke and carbon monoxide alarms. Keep note of the original install date and the date each alarm was checked thereafter for your records.
- Check the building’s siding, brick and stucco walls for cracks, peeling paint and rot.
- Clean out air conditioning filters and vents. Remove any lint, dust and dirt from around A/C coils.
- Check sidewalks, stairs, decks, balconies and ramps for cracks, lifting and possible water intrusion.
- Turn on and check all lawn sprinkler valves and look for broken heads, pipes and errant concrete watering.
- Inspect water heaters and boilers for proper operation.
- Check and adjust any exterior lights and timers.
- Check on your residents and ask for any feedback on anything that might need repair. They live at the building day in and day out. Their input can be quite valuable in terms of preventive maintenance and resident relations.