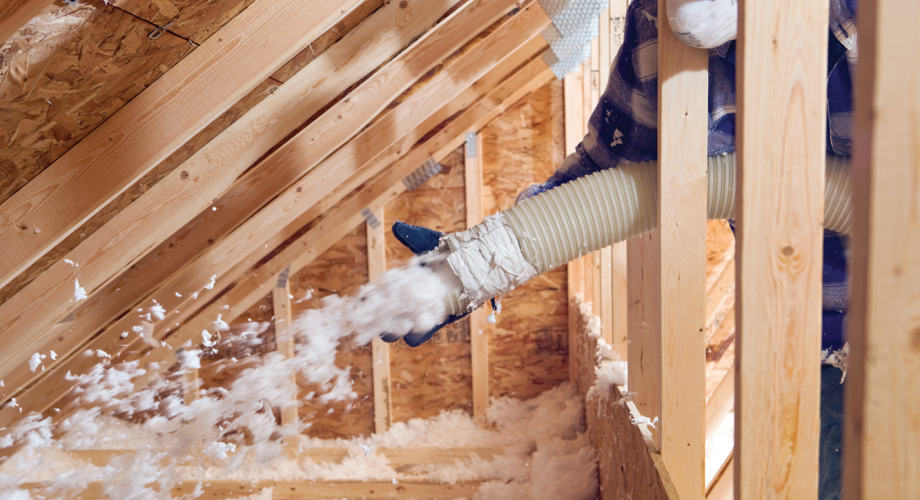
Q: We have double story townhouse-type units with the bedrooms upstairs. The residents say that the bedrooms always have a large temperature difference between the upper and lower floors. What do you suggest?
A: The first recommendation is having your HVAC system inspected. Have the technician check for proper operation of the cooling system and proper balance of the system in relation to the upper and lower floors. If the system is properly operating, the next step is to investigate the attic and determine the amount of insulation—or lack thereof. The best and cheapest solution will be to have an insulation company blow new insulation material into the attic space. This will dramatically lower the temperature differences between floors. If you are unable to properly insulate the attic because of a flat roof, the last and most expensive alternative will be to install a second HVAC unit for the upstairs, which will create a separate cooling and heating system for the upper floor.
Q: I have been replacing rusted and dented HVAC vents and electrical wall receptacles in a rental unit; however, they don’t look right. There are a lot of gaps between the vents and plates and the wall. Some of the walls are not perfectly flat or the texture is bumpy. How do I make these installs
look more professional?
A: Caulk is your friend and will hide a multitude of sins! On a job like this, we recommend getting a squeeze tube of painter’s caulk. Squeezable caulk tubes are readily available at any hardware or home center. Make a small angled cut off the tip of the tube. It’s best to make the cut about 45 degrees. You want to open the tube just enough to get about an 8-inch thick line of caulk out of the tube. Run this caulk line all around the vents and wall plates edges. Gently run your finger along the caulk line pressing it into place. Any excess caulk can be removed with a damp paper towel. Once done, your vents and plates will look like they are part of the wall and will look very professional.
Q: My husband and I are installing new interior doors in our vacant unit. My understanding is using pre-hung doors is better and easier, and my husband insists that buying a door slab is cheaper and faster. We’ve never installed doors before and want to do it right the first time. What’s the best way?
A: We have found that there are no two doors hung alike. They are all unique to their doorways. Let’s start with your husband’s plan: When you buy a slab door, it does not have a hole for the doorknob or latch; it also does not have the hinges attached. It might take a master carpenter to perfectly fit the door; the door frame might not be square, which means you will need to trim the door to fit the opening. You will find getting the hinges to line up with the existing hinges on the jamb is not an easy feat. You also need a special tool to drill the doorknob hole and latch. It might take you a few doors to get it right, which may negate the savings of buying a slab door.
We highly recommend buying pre-hung doors. The pre-hung door comes as a complete door, including jambs, trim, hinges, doorknob and latch holes, etc. The pre-hung door comes as a package with the jambs already square to the door. A pre-hung door can be easily installed by a novice the first time and is much faster than trying to wrestle with a slab door. After removing the old door jamb and trim and exposing the rough opening, insert the pre-hung door into the rough opening. Using a level, plumb and level the hinge side of the jamb using shims and gently nail the hinge side of the jamb in place. Level the top of the jamb using shims and nail into place. When using shims on the doorknob side of the jamb, ensure the door opens and closes freely without binding and nail the jamb in place. Most pre-hung doors come with the trim in place. The trim can now be nailed, and caulk should be used around the trim to hide any gaps. Paint, install the knob and you are done.
Installation tip: Do not disassemble the pre-hung door package. Install it as it came from the hardware store. The rigid packaging will help in keeping everything square while you install the door.
Do you have DIY maintenance questions? Send them to [email protected].